On Projects

Post-Script: There's a surprising amount of detail on the Internet about these obscure devices. For starters, you should visit the Afghanistan Box Camera site. Then take a look at all the images available online, from various countries including Argentina and Afghanistan.
I had a few setbacks this week with the project. I started out wanting to reuse as much scrap material found around my house as I could, and so I cut some laminate flooring tile into pieces, but only found out a day or so later that the plastic-like coating prevents glue from adhering properly; and I didn't want to mix up a huge batch of epoxy. And so I made a trip to the hardware store, where I purchased some cabinet-grade plywood. I figured if I was going to all the trouble of making this thing, I might as well do it the right way.
There are two basic configurations of these boxes. One type, popular in India years ago, used an old bellows camera attached to the front, with room inside for processing the paper negatives. The other type, which I've decided to base my design on, is the type used in Afghanistan, whereby a camera lens is fixed to the front of the box and an internal focusing mechanism is used, that employs a ground-glass film holder bracket mounted to sliding rods, operated by a guide rod that protrudes out the back of the box. There's a door that opens in the rear, from where the operator can see into the box to adjust focus on the view screen. The operator manipulates the paper via a light-tight arm sleeve, mounted either to the side or the back, depending on the design. Mine will have the arm sleeve mounted to the side.
Finding truly light-tight fabric is a bit harder of a challenge than what you might expect. The only light-proof fabric commonly found in craft stores is the heavy oil-cloth type of tablecloth material, which I used in the past with the portable darkroom box, but it's rather stiff to work with. In places like Afghanistan it's common to use the sleeve of an old jacket, but I don't have any jackets worthy of cutting up for this project. So I'll probably source some rubber-coated bellows fabric, available from a specialty supplier at a rather steep price.
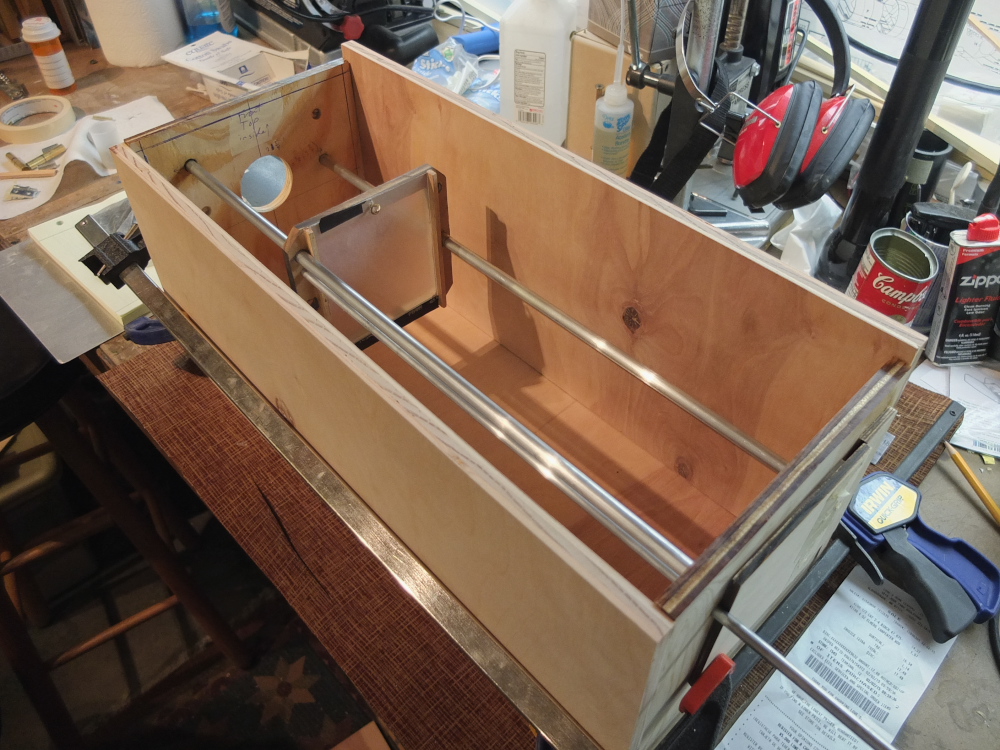
The focusing mechanism uses a pair of aluminum rods upon which the view screen/film holder bracket rides, controlled with a smaller aluminum rod that extends out the back of the box. Getting the rods lined up parallel to one another was key to making the whole thing operate smoothly. The view screen is a thin sheet of Lucite plastic that's had one side sanded down to serve as a ground glass. It hinges back, permitting a sheet of photo paper to be inserted.
Before the cabinet pieces can be glued together, I need to finish the door and hinges on the back end; cut the hole and make the mounting bracket for the arm sleeve in the left side; mount a red-filtered viewing port to the top, directly above the developer tray, to enable development-by-inspection; and fit a bracket to the front enabling several lenses to be interchangeably used - the main lens will be a 127mm Kodak Ektar, taken from an old Speed Graphic, but I also have an improvised lens made from a binocular objective, that's also mounted to a Graflex-style lens board, and works wonderfully for portraits, as it exhibits a nicely soft effect around the edges.
While most of the traditional types of these boxes have the top surface function as a hinged access lid, I'm planning on making the right side (opposite the arm sleeve) hinge open instead; this will give me easier access for installing and removing the chemical trays, which are little plastic craft storage boxes. The reason for this change is that I made the interior of the box as small as I could, while still providing room for the three trays, but in so doing the focus guide rods prohibit removing the trays through the top without tipping them on-edge, which would spill liquids inside the box. The overall dimensions of this box is 9.5" x 9.5" x 21.5"
There are other considerations, once the device is finished. For one, though I don't intend on becoming a professional street portraitist, I might want to accept donations, to cover the cost of paper and chemicals. As such, I might want to get a business license and peddlers permit, enabling me to do this in public without legal hassle. Then there's the challenge of keeping the chemicals at room temperature while out and about, which could be a challenge in cold weather. Being as the sun is usually bright here in New Mexico through much of the winter months, a little solar heat box might work as a way of keeping bottles of chemicals warmed up, as a standby supply. I haven't mentioned the most important item of all, becoming skilled at making portraits in natural light, which will only come with time. I foresee a period of time where family members and friends alike (if they remain friends, that is!) will be used as test subjects, until I get up to speed with the operation of the camera and processing.
One important detail for your edification is how the pictures are made. Like others, I'll be using light-sensitive silver gelatin, black & white photo paper, the kind used to make darkroom prints. When used in place of film, these are known as paper negatives and, as the term suggests, produce after development a negative image. I've been working with paper negatives for decades, another reason why these types of cameras fascinate me.
But since the subject desires a positive print, the paper negative, still wet from processing, is placed on a copy stand bracket, in front of the lens, and re-photographed onto another piece of paper, which is then also processed to make a positive print. Overall, from initial exposure to a finished print, I expect the process to take no more than 15 minutes. I would expect to keep the original negatives and give the subject the resulting prints.
Another technique that I experimented with earlier, using the large darkroom box and an old Polaroid Model 800 camera, was contact printing the paper negative, using the sun as the light source. Here I installed a thin sheet of clear glass inside the Polaroid, and placed a piece of white frosted plastic over its lens. Then, aiming the Polaroid at the sun, I'd use its shutter to time the exposure. The sandwich of paper negative and print paper would then be unloaded in the dark box and processed. I don't see being able to use this technique with this new box, since it lacks the necessary room for loading a contact printing device.
Typecast via Smith-Corona Silent. I replaced its red/black ribbon with a standard black Porelon #11472 typewriter ribbon, purchased at Office Max; these make a nice, black imprint.
posted by Joe V at 7:58 PM
![]()
![]()

3 Comments:
Very interesting project. I can't wait to see the finished item.
I built my own bellows a few years ago -- by luck. I happened into a Michael's and there were some neat old folios on the clearence shelf, black, flexible and light tight fabric. A bit thick for bellows, but they did work.
Have you thought of blackout curtains? Available at Amazon, Joann's, target. They are made to keep all sunlight out of the room. Also, I sort of remember reading many years ago that you can expose paper negative, then "flash" the paper with light to make it positive. You may have to do this after partially developing the first exposure. I think it is used to make positive black & white slides from negatives. Also, I am wondering if there is a single solution developer/fix for such situations. Good Luck, and I can't wait to see your results.
Phil
Good luck with this really interesting project, and thanks for always posting the details of your typecast. The photography stuff is really fascinating! But... I'm mostly here for the typewriters... :-) . As always, really enjoying your writing. ~TH~ http://wrongwaywriteway.com
Post a Comment
<< Home